Monday, February 15, 2016

Disable Adaptive Brightness on Windows 8, 8.1 and 10

If you have a newer laptop running Windows 8, 8.1 and 10, you probably have noticed your screen automatically adjusting brightness when switching applications that have light to dark backgrounds, or when working in different lighting conditions. This is due to a feature that makes use of the ambient light sensors on your laptop to automatically adjust your screen's brightness level - aptly named Adaptive Brightness. This can be useful for conserving battery life, but can be annoying when you are trying to focus, read or work.

Disable Adaptive Brightness ( I tested this on Windows 8.1, but should work on both 8 and 10 )

  1. Open the Windows Control Panel ( Do Windows key + C on your keyboard to open the Windows Charms, click on Settings and select Control Panel ).
  2. From the Control Panel, navigate to Hardware and Sounds > Power Options.
  3. On your selected Power Plan, click on Change Plan Settings.
  4. Next, find and go to Change advanced power settings.
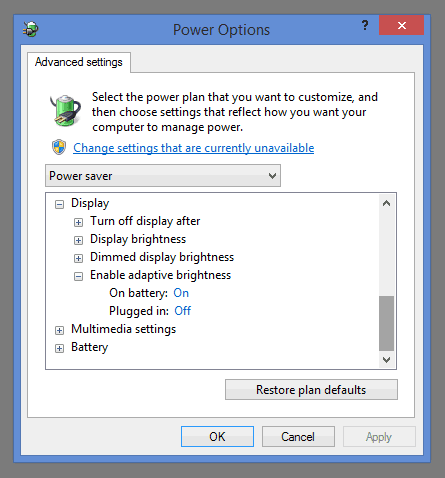
  5. On Power Options, look for Display and click on the plus sign to expand the available options.
  6. Expand Enable adaptive brightness and turn off for either On battery or plugged in, or turn off for both.
  7. Click on Apply to save changes.


Note: After doing the steps above, you may need to restart your PC for changes to take effect.


Tuesday, December 23, 2014

VLC does not support the audio or video format "G2M4"

While trying to play a GoToMeeting Recording, I encountered the following error message:

VLC does not support the audio or video format "G2M4". Unfortunately there is no way for you to fix this.

To resolve the issue, I downloaded and installed the Windows Media Player codec from GoToMeeting. Follow the link and click on the button "Install GotoMeeting codec".

Saturday, April 12, 2014

Using .ico format in Photoshop

I usually would just use free online converters for generating favicons, but recently I just stumbled upon an old plugin that works from Photoshop 5.0 ( on Windows ) up to latest version. Just remember to download the correct plugin version and read the instructions for proper installation.

Link: ICO (Windows Icon) file format plugin for Photoshop

Thursday, August 30, 2012

Remove Search the web (Babylon) from Firefox

If opening a browser you find out that your default search has been changed to Babylon search, and that your browser now has the Babylon toolbar, then a recent application you just installed has been bundled with an installer for this sneaky toolbar and browser extension for Firefox, Chrome and IE.

You can follow this guide from a Babylon support page on how to remove the unwanted application and extensions that it has installed on Firefox and Chrome and Internet Explorer.

After following the guide, try to install and run Spybot ( a malware removal tool ) to remove registry entries that Babylon has created or changed.

I found that after doing the removal of the applications associated with Babylon, uninstallation of browser extensions and running Spybot, Firefox still had some settings that remained from the Babylon software, which resurfaced after updating Firefox to a newer version. One of things that resurfaced was that my search bar was using Babylon again. To remove these settings, what I did was to reset Firefox to its default settings. You can do this by:

Important note: Resetting Firefox will remove all the things that have been accumulated by Firefox, including history, saved site passwords, etc.

  1. Click on the Firefox menu button and navigate to Help > Restart with Addons Disabled.

  2. On the popup box, select Restart.

  3. Once Firefox starts up again, it will open another dialog box. Select Reset Firefox. Confirm that you really want to reset by clicking on Reset Firefox for the second time.

  4. Once Firefox starts up again, you will be given the first run screen, as if you have just reinstalled Firefox.

Tuesday, August 14, 2012

Changing from Dynamic to a Static Port for an SQL Server Named Instance

  1. Open SQL Server Configuration Manager

  2. Expand SQL Server Network Configuration

  3. Open ( Double-click ) on Protocols for

  4. If not enabled, change TCP/IP status to enabled ( Right-click and select Enable ). If already enabled, open TCP/IP ( Double-click )

  5. On TCP/IP Properties go to the IP Addresses, scroll down to IPAll. Change the value for TCP Dynamic Ports to blank, and the TCP port to the Static Port that is desired ( for example 1433 )

  6. Click Apply to make changes, and OK to close the window.

  7. Restart the SQL Server Services ( on SQL Server Configuration Manager, right click on SQL Server Services and click restart )

Note: Guide above is applicable to MS SQL Server 2008. Steps may vary depending on the version of MS SQL that you have.

Friday, June 15, 2012

Disable Avast! Antivirus Update Notification Sound and Popup


I've been using Avast! on my personal machine for a couple of years now, and even though I like being reminded that my Antivirus has been updated, there are times that I am focused on something and the sudden sound and popup reminder becomes a distraction.

Note: Instructions below are based on Avast! 7.

To disable sounds:
  1. Open Avast! by clicking on the Toolbar tray icon.
  2. Click on Settings near the top-right of the Avast! screen.


  3. On the left menu of the Basic Settings page, select Sounds and Uncheck Enable avast! sounds.


To disable update notifications:

  1. On the left menu of the Settings page, select Updates, Click on Details to show extra options, and uncheck Show notification box after automatic update.


To disable both sound and popup notifications ( Silent / Gaming Mode ):

  1. On the left menu, select Silent / Gaming Mode, Tick the checkbox for Silent / Gaming Mode.


Tuesday, May 15, 2012

Using a Test SMTP Server For Local Drupal 7 Email Testing

I don't usually require testing email notifications and other email related functions during local site development using Drupal, but there are times when you really need to test how, when and to whom emails are being sent to.

I use Uniform Server for local development, but this should apply to any WAMP install, as it uses just 2 things:
  1. First, the SMTP module
  2. Second, an account in mailtrap.io
For those who are wondering why one should use mailtrap instead of just connecting to hotmail, yahoo or gmail accounts, reasons are:
  • Most email providers will require you to connect via SSL / TLS
  • and will also try to block you believing you are trying to send out spam
Steps
  1. To get SMTP functionality, install the SMTP module
  2. Once you have installed the module, it will require you to input SMTP details. This is where mailtrap.io comes in.
  3. Create an account in mailtrap.io. Once you sign up, you'll receive a confirmation email in your inbox.
    Confirm your email
  4. Go back to mailtrap.io and create an Inbox
  5. Once an Inbox is created, you'll be given SMTP details that you can use
  6. Copy over to the SMTP module configuration page the SMTP details like SMTP Server, Username, Passwords, etc.
  7. Save, and test.